Migration to Microsoft Exchange (Outlook) Server
![]()
Migration to Microsoft Exchange (Outlook) Server
 |
Overview |
| This program allows QuickMail users to migrate their Mail Folders including Attachments, Personal Address Books and Personal Address Groups to Microsoft Exchange. It also converts Meeting Maker's Events and ToDos to Microsoft Schedule Plus and Outlook Calendar | |
| The program migrates both QuickMail PRO and QuickMail LAN versions | |
| It supports both MAC and PC platforms | |
| The program, QMailMig, is intended to be used by an administrator responsible for migration | |
| The following network environment should be setup: | |
| • | a shared "root" directory should be created which can be accessed by all QuickMail users |
| • | under this root directory, a sub-directory for each user should be created using their exchange SMTP UserID as the sub-directory’s name |
| • | each user should have write access to their |
| • | the administrator’s workstation should have read access to the root directory |
| • | the administrator’s workstation should have access to a shared directory accessible by from an NT server where Exchange Migration Wizard (Mailmig.exe) will be running |
 |
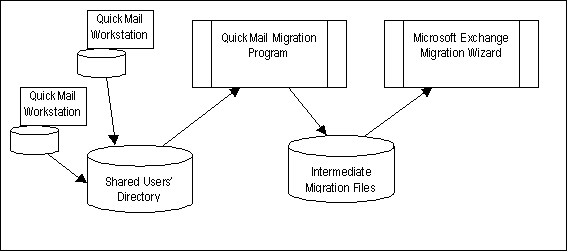
| QuickMail users can then copy their Mail Folders and files into a their <UserId> sub-directory | ||
| The administrator starts the Migrator program and selects all or some of the QuickMail users for migration | ||
| The program then reads each user's Mail Folders and files. It converts the data to Microsoft Exchange intermediate migration files (PKL, PRI and SEC). These files are used by the Exchange Migration Wizard : | ||
|
||
| When the Migrator program runs, a set of log and exemption files (i.e. any warnings/errors encountered) will be generated. The log files are in a tab delimited format. The files can be viewed using a text editor or spreadsheet program | ||
| Once the Migrator program finished, the administrator then starts the Microsoft Exchange Migration Wizard from the Exchange Administration Tools and imports the intermediate files to Exchange Server |
 |
Preparing for Migration |
| Mail Folders, Personal Address Books(PAB) and Personal Address Groups(PAG): | |
| • | QuickMail Folders are stored as PC/Mac sub-directories |
| • | PABs and PAGs are stored as files |
| For example QuickMail PRO stores all the files in a QMail subdirectory: | |
 |
|
|
All files and sub-directories from the QMail sub-directory should be copied to the the |
|
| MAC Users can copy the files using our MRU utility program. This program runs on the MAC platform. It copies a source directory and renames (if necessary) all sub-directories and files to ensure that only valid WIN32 characters are used in the destination directory | |
| Meeting Maker: | |
|
Meeting Maker's Event and ToDos should be a exported using Meeting Maker -> Export to the |
|
 |
Program Description |
| The program is written in Microsoft Visual Basic 5.0 and can run on a 32-bit Windows platform. The program is called QMailMig.exe. It invokes a series of wizard like forms. The following pages describe each form | |
| Startup Screen | |
 |
| Optional User Names File | |
| This field points to a text file, which consists of a list of user names. If the file is not supplied, you can manually enter the User IDs on the second screen | |
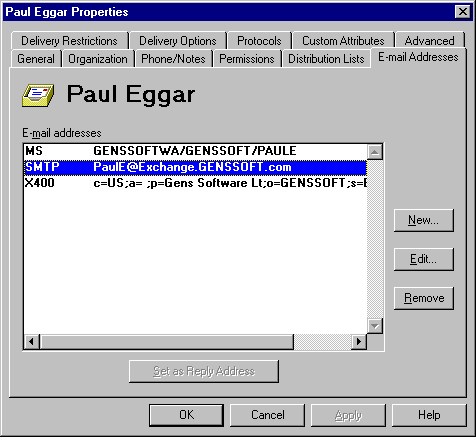
| These User IDs are the same as the SMTP user names defined in Microsoft Exchange Server. | |
| For example: | |
| • | if Radik Gens’s SMTP address is SMTP:radikg@abc.com, use radikg |
| • | if Paul Egger’s SMTP address is SMTP:PaulE@Exchange.abc.com, use PaulE as the user name |
| Note: user names do not have to be case sensitive | |
| To find out the SMTP User ID, start the Microsoft Exchange Server Administration program, double-click on the user object and select the E-mail Addresses tab: | |
 |
|
| QuickMail Folders Drive and Path | |
|
All files and sub-directories from the QMail sub-directory should be copied to the the |
|
| Specifies the drive and path of the root sub-directory described in the Overview above | |
| For example: | |
| Q:\QmailMig\UserData |
| . . . |
| Q:\QmailMig\UserData\RadikG\Main.add |
| Q:\QmailMig\UserData\RadikG\Managers.grp |
| Q:\QmailMig\UserData\RadikG\InBox\ |
| Q:\QmailMig\UserData\RadikG\My Filed Mail\ |
| Q:\QmailMig\UserData\RadikG\Research\ |
| . . . |
| Q:\QmailMig\UserData\PaulE |
| Q:\QmailMig\UserData\PaulE\MyAddr.add |
| Q:\QmailMig\UserData\PaulE\InBox\ |
| Q:\QmailMig\UserData\PaulE\Jokes\ |
| Q:\QmailMig\UserData\PaulE\Development\ |
| PRO Version and LAN Version option buttons | |||||
| Click the version from which the QuickMail users are migrating from | |||||
| Exchange Server | |||||
|
Location of Intermediate Files Specifies the drive and path of a sub-directory where the intermediate migration files (PKL, PRI and SEC) created during migration will be stored. The Exchange Migration Wizard should have read access to this sub-directory |
|||||
|
SMTP Domain Name The SMTP Domain Name that will be appended to each user’s SMTP User ID. |
|||||
| You can find the domain name in the Exchange Server Administration Program, by double-clicking a user object and selecting the E-mail Addresses tab | |||||
| Log Files | |||||
| The check boxes can be used to specify extra logging levels as follows: | |||||
| |||||
| All log files will have a file name of |
|||||
| |||||
| Use the Browse button to select the LogFiles Drive and Path for these logs | |||||
| Workstation | |||||
| This ID is used for uniqueness of the PKL file name and to identify the workstation that created the intermediate migration files | |||||
 |
User Input Screen | ||||||
| This screen displays the contents of the User Names File specified on the startup screen. The list box will be blank if no file has been specified | |||||||
| |||||||
| To edit this list, highlight a name. It will be displayed in the text box below. The text box can be edited: | |||||||
| |||||||
| The edits are for run-time use only and do not update the file on disk | |||||||
 |
User Selection Screen | ||
| This screen allows the administrator to select a subset of users for the current migration batch. The single arrows move highlighted names. Double arrows move all | |||
| |||
 |
Migration Status Screen | |||
| Displays the migration progress for each selected user | ||||
| ||||
| When all selected users have been migrated, the screen will be changed to: | ||||
| ||||